Digital Black & White Photos
October 10, 2007 Black & WhiteThere are numerous ways to convert color photos to black and white in Photoshop. Simply changing the mode to grayscale or desaturating the photo are two simple methods that often result in a flat uninteresting image. A more sophisticated approach is to open the Photoshop Channels tab to find the three separate channels for red, green, and blue. Sometimes choosing only one channel and discarding the other two results in a richer and more compelling black and white image when ultimately converted to grayscale.
Hanging On a Pole,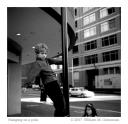 is an example of a rich photograph produced in this manner. While I shot this photo using black and white film, I nevertheless scanned it as a color image, thereby creating three channels of information, although it was shades of black, white, and grey in the three primary color channels.
Another photograph, Ocean City, 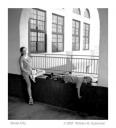 was problematical because the light outside the archway was so bright compared to the internal scene that no one color channel worked in both segments of the image. Consequently, I kept only the red channel for the internal segment of that photo and the green channel for the windows outside. This process resulted in a nicely developed image.
To best appreciate these two photos, please visit The Gatesman Photo Gallery. At the gallery display pages, be sure to keep clicking on the image until you see it at its highest resolution.